In this article I will
explain how to install Oracle Enterprise Manager 13c on Linux 6 and 7.
Installation process is almost similar for both Linux 6 and 7. I am using
Oracle Enterprise Linux for this installation. Recommended way is to install
database repository on a separate server and OMS on a different server, but for
this installation I will be using a single server for both repository and OMS
installation. You may download OEM 13c from www.oracle.com. Latest downloadable version available while
writing this article is 13.1.0.0. Download all 5 files as shown below.

Official installation
guide is available here
First steps is to install
oracle database software, and create a database. Following document can be
followed for this
Installing Oracle 12c R1 Database software on Linux 6
Installing Oracle 12c R1 Database software on Linux 7
After database software installation has been done, you need to create a database using dbca. Best option is to use Oracle provided database templates available here. Template zip file “12.1.0.2 DB Template for EM 13.1.0.0 on Linux x86-64” is the one I downloaded because I used 12.1.0.2 database as repository for this OEM installation. After downloading template file, extract the zip file under $ORACLE_HOME/assistants/dbca/templates directory, and dbca would be able to show the templates during database creation wizard as can been seen bellow. I selected template for small deployments. You should select based on how many servers you will be going to manage.

1)
Perform following tasks to prepare the host for OEM 13c installation.
Perform following tasks to prepare the host for OEM 13c installation.
a)
Make sure you have entries in the /etc/host file
for the name resolution.
127.0.0.1 localhost localhost.localdomain localhost
192.231.231.50
salman11.salman.com salman11
b)
Edit /etc/selinux/config and set value for SELINUX
to either “permissive” or “disabled”.
SELINUX=permissive
c)
Disable the firewall
[root@salman11 ~]# systemctl start
firewalld.service
[root@salman11 ~]# systemctl stop
firewalld.service
[root@salman11 ~]# systemctl disable
firewalld.service
rm
'/etc/systemd/system/basic.target.wants/firewalld.service'
rm
'/etc/systemd/system/dbus-org.fedoraproject.FirewallD1.service'
d)
Reboot the host
|
2)
As root, confirm that following packages are installed in your OS. These are required for both Linux 6 and Linux 7. Install any missing package from yum repository or respective Linux installation media
As root, confirm that following packages are installed in your OS. These are required for both Linux 6 and Linux 7. Install any missing package from yum repository or respective Linux installation media
glibc-common-2.3.4-2.43(x86_64)
glibc-devel-2.3.4-2.43(x86_64)
glibc-headers-2.3.4-2.43(x86_64)
glibc-utils-2.3.4-2.43(x86_64)
glibc-2.3.4-2.43(x86_64)
Example (Check if
package is installed)
[root@salman11 ~]#
rpm -q glibc-common
glibc-common-2.17-55.el7.x86_64
Example (yum)
[root@salman1 ~]# yum install glibc-common
Example (Linux
Media)
[root@salman1 ~]#
rpm -i glibc-common
|
3)
For Linux 6 only, check if following packages are installed. If not, install from yum repository or Linux installation media
make-3.81
binutils-2.20
gcc-4.4.4
libaio-0.3.107
glibc
glibc-common-2.12-1
libstdc++-4.4.4
libXtst-1.0.99 (x86_64)
sysstat-9.0.4
glibc-devel-2.12-1.7 (i686) (This is a 32-bit
package)
glibc-devel-2.12-1.7 (x86_64) (This is a 64-bit
package)
glibc-2.12-1.47.0.2 (Applicable only for Oracle Linux 6.2,
which includes RH6.2 and UEK 6.2)
Example
(Check if package is installed)
[root@salman11 ~]# rpm -q glibc-devel
glibc-devel-2.17-106.0.1.el7_2.6.x86_64
Example
(yum) – installing glibc-devel 32-bit package
[root@salman1 ~]# yum install glibc-devel.i686
Example
(Linux Media)
[root@salman1 ~]# rpm -i glibc-devel.i686
|
For Linux 7 only,
check if following packages are installed. If not, install from yum repository
or Linux installation media
make-3.82-21
binutils-2.23
gcc-4.8.2-16
libaio-0.3.109-12
glibc
glibc-common-2.17-55
libstdc++-4.8.2-16
sysstat-10.1.5-4
glibc-devel 2.17-55 (i686) (This is a 32-bit
package)
glibc-devel 2.17-55 (x86_64) (This is a 64-bit package)
libXtst-1.2.2-2 (x86_64)
Example (Check if
package is installed)
[root@salman11 ~]#
rpm -q glibc-devel
glibc-devel-2.17-106.0.1.el7_2.6.x86_64
Example (yum) – installing glibc-devel 32-bit package [root@salman1 ~]# yum install glibc-devel.i686
Example (Linux
Media)
[root@salman1 ~]#
rpm -i glibc-devel.i686
|
4)
Set the port range by editing /etc/sysctl.conf. Restart network services after setting this value.
net.ipv4.ip_local_port_range = 11000 65500
|
5)
Set kernel.shmmax, Kernel Parameter.
If you are installing Management Repository database and OMS on the same host, then set this parameter to the value as mentioned in the database installation guide. It means that if you have already set this value during database installation, you don’t need to set it now.
If you are installing only OMS on this server, set value of this parameter to 4294967295 under /etc/sysctl.conf file.
Along with kernel.shmmax, set other parameter as well as mentioned bellow
fs.file-max = 6815744
kernel.sem = 250 32000 100 128
kernel.shmmni = 4096
kernel.shmall = 1073741824
kernel.shmmax
= 4398046511104
kernel.panic_on_oops = 1
net.core.rmem_default = 262144
net.core.rmem_max = 4194304
net.core.wmem_default = 262144
net.core.wmem_max = 1048576
net.ipv4.conf.all.rp_filter = 2
net.ipv4.conf.default.rp_filter = 2
fs.aio-max-nr = 1048576
net.ipv4.ip_local_port_range
= 9000 65500
|
6)
Create OS groups and user. If repository database is on the same host as OMS,
you would already have created OS groups and user while installing database.
Otherwise create users as follows
Create
OS groups
#group add dba #group add oinstall Create OS user and set password #useradd –g oinstall –G dba oracle #passwd oracle |
After creating user, set limits by creating a new file /etc/security/limits.d/oracle_limits.conf, and adding following lines in this file. You don’t need to perform this if your repository database is already configured on this server because you would already have set these limits during database configuration.
oracle
soft nofile 1024
oracle
hard nofile 65536
oracle
soft nproc 16384
oracle
hard nproc 16384
oracle
soft stack 10240
oracle
hard stack 32768
oracle
hard memlock 134217728
oracle
soft memlock 134217728
|
7)
I have downloaded/extracted binaries under /u02/OEM13c directory on my server. Log into the OS as “oracle” user (using desktop, or use some X server software) to initiate the installation. You don’t need to extract the zip files as these will be extracted automatically during the installation.

8)
Open a terminal and go to /u02/OEM13c directory, and start installation.
$ cd /u02/OEM13c
$ chmod 775 em13100_linux64.bin
$ ./em13100_linux64.bin
Click Next
Open a terminal and go to /u02/OEM13c directory, and start installation.
$ cd /u02/OEM13c
$ chmod 775 em13100_linux64.bin
$ ./em13100_linux64.bin
Click Next

9)
I selected “Skip” here for automatic software updates (can be setup after installation also), click Next
I selected “Skip” here for automatic software updates (can be setup after installation also), click Next

10)
This screen will check prerequisites. Fix any issue mentioned here by the installer. I ignored 1 warning related to port range (my port range is more than recommended, so I ignored it). Click Next
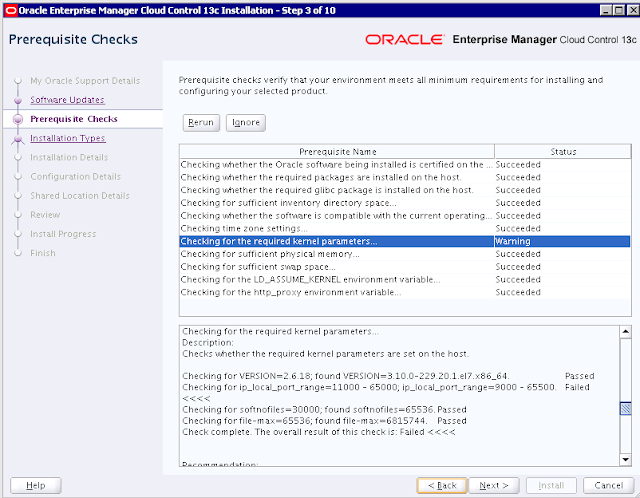
This screen will check prerequisites. Fix any issue mentioned here by the installer. I ignored 1 warning related to port range (my port range is more than recommended, so I ignored it). Click Next

11)
For installation type, I am selecting “Simple”. “Advanced” installation option should be selected for production deployments, click here for official installation guide. Advanced installation has a few of extra screens/steps
For installation type, I am selecting “Simple”. “Advanced” installation option should be selected for production deployments, click here for official installation guide. Advanced installation has a few of extra screens/steps

12)
Provide directory’s location for middle ware and agent installation. Click Next
Provide directory’s location for middle ware and agent installation. Click Next

13)
Provide passwords details and also database repository host name, listener port, SID/service name, and sys password of repository database, click Next
Provide passwords details and also database repository host name, listener port, SID/service name, and sys password of repository database, click Next

14)
Provide shared directories location for Oracle Software Library. Provided a network share if you plan to use multiple OMS installation for load balancing. Since I am installing a single OMS, I am providing local directory. Optionally you can also configure BI Publisher at a shared location to be shared by multiple OMS installations. Click Next
Provide shared directories location for Oracle Software Library. Provided a network share if you plan to use multiple OMS installation for load balancing. Since I am installing a single OMS, I am providing local directory. Optionally you can also configure BI Publisher at a shared location to be shared by multiple OMS installations. Click Next

15)
Click Install
Click Install

16)
Monitor the progress
Monitor the progress

17)
Open a separate command line windows and execute root scripts when prompted, and click OK after execution completes.
Open a separate command line windows and execute root scripts when prompted, and click OK after execution completes.

18)
Copy all information provided on the last screen for your reference. Click Close to complete the installation.
Copy all information provided on the last screen for your reference. Click Close to complete the installation.

19)
Access the OEM using a web browser. For my installation, access URL is https://salman11.salman.com:7803/em. Provide SYSMAN as username and password you selected in 13th step above
Access the OEM using a web browser. For my installation, access URL is https://salman11.salman.com:7803/em. Provide SYSMAN as username and password you selected in 13th step above

20)
First time log in will let you do customization at the first screen. I chose to skip this.
First time log in will let you do customization at the first screen. I chose to skip this.

21)
Click Accept
Click Accept

22)
Select the home page for your OEM. I selected Summary as my home page.
Select the home page for your OEM. I selected Summary as my home page.


23)
To check about ports being used by the OEM components after the installation, you can check portslist.ini file.
To check about ports being used by the OEM components after the installation, you can check portslist.ini file.
[oracle]$ cat
/u01/software/em/middleware/install/portlist.ini
Enterprise Manager Upload Http Port=4889
Enterprise Manager Upload Http SSL Port=4903
OHS Http Port=9788
BI Publisher Http Port=9701
Enterprise Manager Central Console Http SSL
Port=7803
Node Manager Http SSL Port=7403
BI Publisher Http SSL Port=9803
OHS Http SSL Port=9851
Managed Server Http Port=7202
Oracle Management Agent Port=3872
Enterprise Manager Central Console Http Port=7788
Admin Server Http SSL Port=7102
Managed Server Http SSL Port=7301
|
Use emctl command to check
status of OMS. “–details” option requires SYSMAN password to be provided to
execute the command.
[oracle]$ /u01/software/em/middleware/bin/emctl
status oms -details
Oracle Enterprise Manager Cloud Control 13c Release
1
Copyright (c) 1996, 2015 Oracle Corporation. All rights reserved.
Enter Enterprise Manager Root (SYSMAN) Password :
Console Server Host : salman11.salman.com
HTTP Console Port : 7788
HTTPS Console Port : 7803
HTTP Upload Port : 4889
HTTPS Upload Port : 4903
EM Instance Home :
/u01/software/em/gc_inst/em/EMGC_OMS1
OMS Log Directory Location :
/u01/software/em/gc_inst/em/EMGC_OMS1/sysman/log
OMS is not configured with SLB or virtual hostname
Agent Upload is locked.
OMS Console is locked.
Active CA ID: 1
Console URL: https://salman11.salman.com:7803/em
Upload URL: https:// salman11.salman.com:4903/empbs/upload
WLS Domain Information
Domain Name : GCDomain
Admin Server Host : salman11.salman.com
Admin Server HTTPS Port: 7102
Admin Server is RUNNING
Oracle Management Server Information
Managed Server Instance Name: EMGC_OMS1
Oracle Management Server Instance Host: salman11.salman.com
WebTier is Up
Oracle Management Server is Up
JVMD Engine is Up
BI Publisher Server Information
BI Publisher Managed Server Name: BIP
BI Publisher Server is Up
BI Publisher HTTP Managed Server Port : 9701
BI Publisher HTTPS Managed Server Port : 9803
BI Publisher HTTP OHS Port : 9788
BI Publisher HTTPS OHS Port : 9851
BI Publisher is locked.
BI Publisher Server named 'BIP' running at URL:
https:// salman11.salman.com:9851/xmlpserver
BI Publisher Server Logs:
/u01/software/em/gc_inst/user_projects/domains/GCDomain/servers/BIP/logs/
BI Publisher Log :
/u01/software/em/gc_inst/user_projects/domains/GCDomain/servers/BIP/logs/bipublisher/bipublisher.log
|

No comments:
Post a Comment